Getting started with ESP8266

There are alternative ways to do development and load your application into the ESP8266 module. For beginner this could cause some confusions so it is must be stated that what is described here is only one of those alternatives. In this tutorial, you will use bare ESP8266 module instead of more expensive ESP8266 integrated development board and you will need the following list of items:
- ESP8266 module – Although any of the modules family member can be used, it is recommended to use ESP-01. For newbie, this module is easy to work with and doesn’t require any soldering.
- FT232 FTDI USB serial adapter – FTDI adapter has USB 5V to 3.3V TTL converter built-in. This is important because ESP8266 chip only uses 3.3V for power and I/O otherwise you will need separate 3.3V power supply for the ESP8266 module.
- Windows PC with installed FT232 driver – Apparently there are a number of unlicensed FT232 clones that can cause problems on Windows PCs because the FTDI-supplied FT232 driver now includes detection logic and will not communicate to unlicensed clones. If you encounter this problem, check this link: Un-brick the FT232RL FTDI USB Serial Adapter
- USB to mini USB cable – Connect PC with the FTDI USB serial adapter
- Female/Female Dupont wires – Connect FTDI USB serial adapter with ESP8266 module
ESP8266 module comes with Espressif firmware that enables you to talk using AT+ commands. In this tutorial however, you will load new firmware, NodeMCU firmware. NodeMCU firmware enables you to talk and write program using Lua, light weight high level interpreter language specifically intended for microcontroller application.
Step 1. Test connection between PC and your ESP8266 module.
Using Dupont wires, connect ESP8266 module and FTDI adapter according to the diagram below. Leave GPIO0 pin opens, not connected anywhere. There is 5V/3.3V jumper in the FTDI adapter that must be set to 3.3V position. Now you can connect the FTDI adapter to the PC and the red LED in FTDI adapter and ESP8266 module will come on.

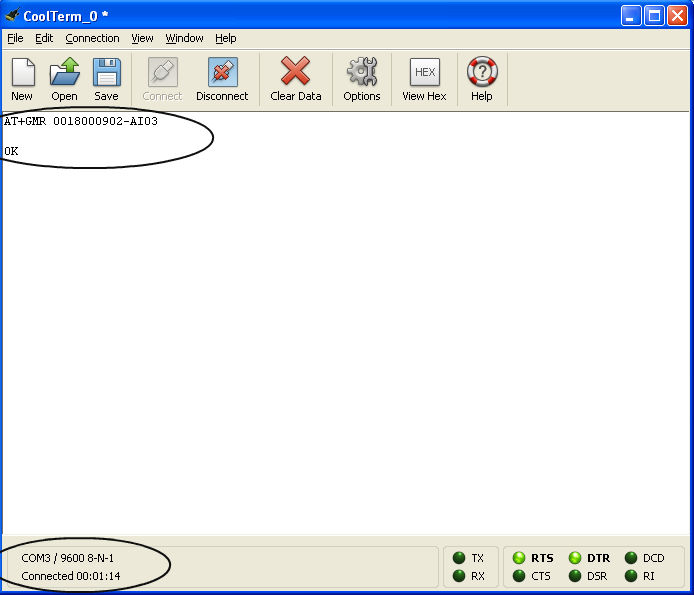
To test if the PC can indeed communicate with the ESP8266 module, you need PuTTY, SimpleTerm, Coolterm or any other similar serial terminal program. This terminal program needs to know which PC’s COM port is being allocated for the FTDI adapter. You can check it in Windows Device Manager. If you can not find it then you may have not installed FT232 FTDI driver.

Once you have set the terminal program with the correct COM port and leave the other default setting, type AT+GMR. You should get the Espressif firmware revision number and OK response.
Congratulation, you’ve got a working ESP8266 module.
Step 2. Now to flash NodeMCU firmware.
To upload the NodeMCU firmware replacing the original Espressif firmware, you need the ESP8266 flasher tool and the NodeMCU firmware file.
- Download ESP8266 flasher tool from Github. There are Win32 and Win64 version, choose one that is suitable for your Windows version.
- Download the latest release of NodeMCU firmware from Github. There are integer and floating points version of the firmware, unless your Lua scripts will needs precision floating points digits, integer version should be sufficient for most application beside it needs less memory.
Power off your ESP8266 module by disconnecting the PC USB cable. To reflash a new firmware, you need to connect GPIO0 pin to the GND (0V). After that , power it back on.
Execute ESP8266Flasher.exe and set the correct COM port. You will see ‘Waiting MAC’ for both MAC addresses.

Go to Config menu.
Here you load the NodeMCU firmware file that you want to use to replace the original firmware.

Go back to Operation menu and click Flash (F).
Reflash should start and both MAC addresses should appear. If the MAC addresses don’t appear within a few seconds, try to reboot it by powering it off and powering on again. If it still doesn’t work, check your connections. Make sure that GPIO0 pin is connected to GND.

The reflashing will take several minutes to complete.

After reflashing, GPIO0 pin should be disconnected from ground in order to operate back in normal mode. Otherwise it will be reboot in UPLOAD (FLASH) mode again. So power it off, disconnect GPIO0 pin from ground and you’ve got an ESP8266 module with NodeMCU firmware.
Now you should try to talk again with your terminal program. This time it will no longer recognize the AT+ commands, instead you have to use Lua instructions and NodeMCU API.

Step 3. Load and run your lua script
Although you can continue to work using your existing terminal program, there are utilities that are specially designed to work with NodeMCU firmware. One of them is Lualoader, it is a Windows program for uploading files to the ESP8266 and working with the Lua serial interface. As well as being a simple terminal program, it has built in Lua command buttons that make it easy to interact and work with the ESP8266 module.
Lualoader doesn’t need any installation, you just need to execute the LuaLoader.exe file. From the Settings menu, select COM Port settings and choose the appropriate COM port for your FTDI USB to serial adapter. Leave other settings unchanged.
If you get “Not connected to comm port” message then select Open COMx at the Settings menu. You should now get “Connected to COMx at 9600 baud” and LuaLoader is connected to the ESP8266.
You can enter Lua instructions manually as before but the nice thing is that now you also can just click on the appropriate button to do the associated instructions. For examples:
- Click the Restart button is the same as executing ‘=node.restart()’ instruction to performs firmware soft reboot.
- Click the Heap button is the same as executing ‘=node.heap()’ instruction to display the amount of RAM available.
- Click the Survey button to list the available Wifi access points visible to the ESP8266.
- Click Set AP button to set the WiFi mode and connect. But you need to enter the SSID and password of your access point in the appropriate text box first. This information is saved in flash memory and will be remembered until changed, even if the module is powered down.
- Click Get IP button to confirm that the ESP8266 is connected to your Wifi access point and get IP address assigned.

Lua instructions also can be saved in a file and executed as a script or program:
- Click the Upload File… button to load the Lua script
- Click the remove button to remove the Lua script
- Click the file.list button to list the Lua scripts that have been loaded
- Click the dofile button to run or execute the Lua script
In this tutorial, you will create and run a Lua script that performs task as web server.
Create a file named httpd.lua and enter the following instructions:
-- Wifi credentials
SSID = “<your wifi SSID>”
wifiPWD = “<your wifi password>”
APState = 0
function wifi_connect()
wifi.setmode(wifi.STATION)
wifi.sta.config(SSID,wifiPWD)
wifi.sta.connect()
end
-- a simple http server
if APState < 5 then
APState = wifi.sta.status() --State: Waiting for wifi
wifi_connect()
end
ip = wifi.sta.getip()
print("IP address: "..ip)
srv=net.createServer(net.TCP)
srv:listen(80,function(conn)
conn:on("receive",function(conn,payload)
--print(payload)
conn:send("<h1> Hello World.....! </h1>")
end)
conn:on("sent",function(conn) conn:close() end)
end)
Load httpd.lua using the Upload File… button. Wait until it completes loading then click the dofile button to run the httpd.lua. Note down the IP address displayed when httpd.lua starts.

Go to your browser and access the web server with http://IP address. You should get “Hello World…..!” page.

In real application, you may want httpd.lua to start automatically whenever ESP8266 starts. To do that, simply create a file named init.lua. Init.lua is the special script which will be run automatically whenever ESP8266 starts or reboot. Inside init.lua you put instruction to run your httpd.lua script: dofile(“httpd.lua”). Now every time you restart or power on ESP8266, your httpd.lua will also automatically start.
Sofar your ESP8266 has been powered from the PC USB port. In real life, the ESP8266 module needs to operate standalone. To do that, you need to power the ESP8266 module with 3V power supply such as 2x AA or AAA batteries. Disconnect ESP8266 from the FTDI adapter. Connect VCC pin and CH_PD pin to positive terminal of the battery and GND pin to the negative terminal of the battery.

Congratulations, you’ve got a tiny web server on your ESP8266 module. Possibly the smallest and cheapest web server in the world!